STEP 1- Dismantling a Diecast Car 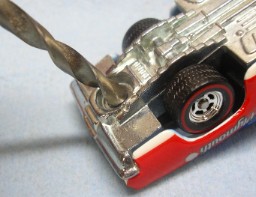
STEP 2- Cleaning and Stripping 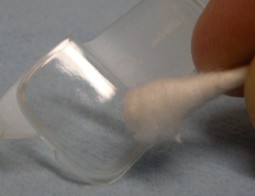
Step 3- Polishing and Paint Prep 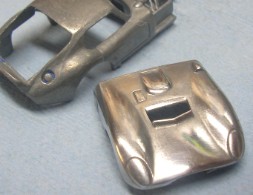
Step 4- Paint and Detailing 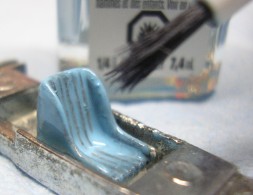
STEP 5- Reassembly
|
THE RESTORATION PROCESS
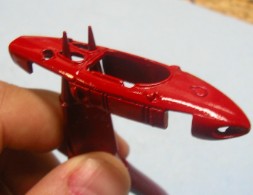
Taking a diecast car apart is very simple. The cars are held together by 1, or in most cases, 2 rivets. You'll need a drill, with 1/16" and 5/32" metal drill bits. Holding the car in your hand, drill through the center of the rivets using the 1/16" bit, taking care not to drill too deep into the post (you don't want the drill to penetrate the body of the car). This will create a guide hole for the larger bit. Switching to the larger bit, drill just enough to wear the head off of the rivet, until the bit is just making contact with the cars base. At this point, the parts of the car should come apart easily. If they don't, gentle prying may be required. If it still won't come apart, drill the rivet a bit more. The car will seperate into 4 components, the base, interior, windows, and the body. To remove the wheels and axles, simply file down the tabs that hold the axle in place, until the axle can be removed from its seat without force. Using anything to pry it out will result in a bent axle. Don't worry about filing the mounts down too far, as epoxy will be required to hold the new axles in place later on anyways.
Give all the parts a wash in soapy water. Once dry, you'll need to strip the old paint off of the body, and in some cases, off the base as well. I recommend Dumond Smart Stripper, by Peel Away. It's an environmentally friendly paint sripper that comes in a spray can, and applies in a thick foam. Cover the parts thoroughly with the paint stripper, and let it sit overnight. In the meantime, you can address the interior. Give it a wash with soap and water. If the windows/glass are in reasonable shape, you can make them look like new using any automotive Carnauba wax. Apply it with a Q-tip in small circles. Once it dries, buff it off with a clean Q-tip, and buff it off further with a soft towel. After letting the paint stripper sit overnight, give the parts a good rinse under hot water. All the paint will run of easily, leaving a paint free surface. You can get the remaining paint out of crevases and seams using small untensiles, like a micro driver, a small modeling pick, and a old toothbrush.
Give the metal parts a good acidic bath in lemon juice to fully remove any impurities. Once dry, give the entire surface a good scuff with 0000 grade steel wool. You will start to notice the surface becoming shinnier. Give the body a good going over, making sure to bring out the shine evenly over the entire surface that will receive paint. You'll need to give the surface a good polish as well. I recommend Mothers Mag & Aluminum polish, applied using a rag on the end of your finger tip. Polish the entire body aggresively several times. Having applied the polish, wipe it off using a soft cloth and Q-tips, and give it a really good buff to bring the shine out further. You can repeat the entire process several times for better results. The glossier the surface is at this stage, the better your paint job will look when it's finished. Use the same process described above to bring out the shine on the cars base as well.
The easiest piece to tackle is the interior. Steering wheel rims can be painted black or brown, seats, dashboards, and door panels can be painted a different colour to accurately match the cars being replicated. Small jars of Testors enamel applied with a fine paint brush work in this application. Some decal sets come with guage faces, so if you're really patient, you can try to put some guages on your instrument panel, a good option for open cockpit or convertible cars. You can dress up the cars base with some detail work as well. (some bases have no detail, in which case you can go straight to clearcoating). Driveshafts, differentails, and exhaust pipes can be touched up with Testors using a fine paint brush. With the detailing completed and dry, you'll want to give the base a shot of clearcoat to maintian its shine, and protect it, as the oils from your skin will dull the finish over time after handling a diecast. Prior to paint, give some thought as to how you will secure the car for the painting and drying process. Give the body a final wash in hot soapy water, and a good rinse. Make sure it's completely dry, and after it's clean, don't handle the car with your fingers, as the oils from your skin can contaminate the finish. Give the car a good coat of paint, sprying in sweeps, going beyond the body, holding the spray can about 25-30 cm away. Tamiya recommends a minimum 1 hour drying period between coats, although the longer you wait between coats, the better. After applying several coats of paint to the body, you can address the finishing touches. Use Testors Paint Markers in orange and red to apply tail lights and signal lights. Apply flat black carefully using a fine brush to detail air vents, grills, and scoops. When the detail paint is complete, you need to apply the decals prior to clear coating. For the best results, trim the edges of the decals down as much as possible. Research the cars on the internet to determine the proper placement of the decals. Once the decals are dry, blot the cars surface extremely gently witha cotton ball, as this will help clean off any decal residue. Now give the body a coat or two of clear coat. Testors Gloss Clear in 100 ml spray cans is recommended.
|